Tips for playing Breath of Fire II - SNES Nintendo Switch Online
I’ve got some tips for first-timers getting into Breath of Fire II via the Nintendo Switch Online - SNES app! Prepare for a giant thread, ‘cause I love this freaking RPG!
The original Twitter thread can be found here, however I have made some edits / improvements to the guide on this post.
The aim of this guide is not to hand-hold every particular section of the game, but to give non-spoilery pointers that should enhance your experience and make certain tough or critical sections a lot more manageable for you. If you’re having trouble figuring out where to go plotwise, the good "ol’ “talking to every NPC you find in town” is sure to set you on the right path.

1) Press ‘Start’ on the naming screen to quickly and automatically name him Ryu. Do it, do it.

2) If you refrain from searching the dressers in the very beginning of the game during the child Ryu prologue, you’ll be rewarded with some extra zenny when you search the drawers in your Home Town apartment as adult Ryu!


3) As with any classic JRPG, talk to all the NPCs you find and search the shelves/dressers in houses! Not only can NPCs steer you in the right direction, but they can offer backstory and utter some truly wacky things!

4) Hunting is easily one of the best zennymakers early on! After a battle, a rustling bush may appear on the world map. Place Bow in the lead using R/L and interact with the bush. You’ll spawn in a random hunting ground. The woodsy areas are the most ideal places to hunt. If playing on Switch, you can try to force this hunting ground to spawn by using the Switch Online rewind feature until you get an ideal spot.
To hunt, press Y with Bow in the lead to fire your crossbow, and use rewind if you mess up. Hunting nets you Roasts, which sell for 200z each at the shop!

5) Make sure to try out every character’s special ability! The easiest way to do this is to put them in the lead with the R/L buttons and pressing Y when they’re on the world map (or in some cases, the Hunting Grounds) and see what they can do!
6) While I consider this to be a “cheat”, there IS an exploit you can take advantage of for making lots ‘n lots of zenny in HomeTown. I only suggest doing this for those who’ve already played the game to death.

7) It’s a good idea to get the best items and equipment in HomeTown (sell those Roasts!) and grind to at least level 5 or 6 before going deep into Mt. Fubi. The water fountain in the cave entrance at Mt. Fubi makes grinding a cinch at this early stage.
8) Love it or hate it, Breath of Fire II has lotsa random encounters. At least the battle themes rock! The item/spell “Smoke” can temporarily decrease the random encounter rate. The dancing Goblin in the menu is a visual gauge for random encounter frequency.

9) After the boss fight in Mt. Fubi, make sure you get the FireRock in the chest before dropping down the hole. FireRock casts the “Fireball” spell which you don’t get until late-game, and you’ll want to save it for a tougher boss fight later.

10) In the Colosseum, after getting the 1,000 zenny in the dressing room treasure chest before your fight, DON'T EXAMINE THE DOOR. Rather, leave the Colosseum & deposit all your money in the bank before going back to open the door. You’ll see why. ;)

11) After defeating your Colosseum opponent, ACT FAST and press “Up” on the D-pad immediately to push her out of the way. This will ensure you have three characters instead of two for an upcoming tough-as-nails boss fight.

12) When you get Sten, KEEP. HIS LEVELS. UP. You’ll eventually reach a story segment where you play as him solo, and you’ll want his levels to be on par with the rest of your team at that point!
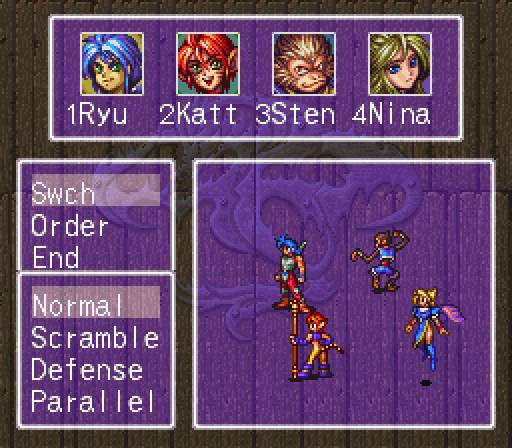


13) You may have noticed you can change Battle Formations in the menu & during battle. The Breath of Fire Fandom Wiki has a good breakdown for how these formations work. If you’d prefer to let the game figure out the best party order for a specific formation, “Order > Auto” can auto-arrange your party to suit each formation.

14) When entering Capitan to the west of Windia, don’t go into the well until you’re ready to be locked into some REALLY tough battles ahead! It’ll be good to have healing items and all the best equipment from Windia before you go down there.

15) After beating the super-tough boss in the well, you’ll be asked to rescue the villagers. Don’t tell Ray “Yes” until they’re all rescued! Rescuing every villager will determine a magic spell you get later, and it’ll determine which carpenters are available to work on your custom town. Talk to every NPC in the well & specifically target the “Chiroru” face huggers and NOT the NPCs to avoid hurting them.


16) Each of the three carpenters has a specific craft that benefits you:
Cottage: Opens a kitchen where you can craft perma stat-boosting items, AP recovery items, and lucrative Gold Bars.
Mughal: Opens a bar with tenants who tell you random facts, such as time played and the number of chests and dressers you’ve ransacked.
Treehouse: The carpenter will take the "Tolen" items you find throughout the world in exchange for rare equipment.
The best deal out of all of these is arguably the Cottage, so I’d wholeheartedly recommend that option. If playing on Switch, creating a suspend point before choosing a carpenter is a good idea.

17) Before going to Witch’s Tower and/or Sima Fort, go to the cave west of the waterfall. Follow all the directions posted on the signs of the cave EXCEPT ditching your weapons. At the end, forgive the chef & you’ll get “Chop Chop”, an attack skill that negates defense, which is helpful against pesky high-DEF enemies. I personally have Ryu learn the skill, since he rarely leaves the party throughout the game.

18) After completing the Witch’s Tower, go back to the area with the five lifts, and take the rightmost lift. It’ll lead you to the left passage. After climbing the stairs, you’ll find the second Shaman, Seso. Fusing Sana or Seso to a character back in TownShip can increase their Strength (Sana) or Wisdom (Seso) by 25%, respectively.

19) After getting Jean, DON’T go to Sima Fort in the center lake just yet! With Jean in the lead, press “Y” on the world map & he’ll turn into a jumbo frog that can swim in lakes & hop over cliffs. He can also jump over gaps and lessen the frequency of random encounters! Enter the top of the waterfall, put Ryu in front, and check out the entirety of the cave for some special secrets.


20) Once your custom town “TownShip” is built, you can chat with your party members at the main HQ, who will all have something fun to say after every plot beat! Also, Dragon Statues will now let you swap out party members.

21) Shamans! Use them! Besides Sana and Seso, there are 4 other Shamans you can find. Only one of them, Solo, is missable. By fusing, you can increase a character’s stats & dramatically alter their appearance and skills! This Breath of Fire Fandom Wiki article has a great breakdown of shaman fusions. Try different combinations, and see what you like.

22) Now that you’ve got your own town, you can recruit six NPCs to live there. Recruiting NPCs is permanent. Some NPCs are useless while others are excellent additions! Do be picky about who you choose, because some of them can only be tied to a specific house. This guide has a breakdown of which NPCs can be recruited.

23) Here are my personal TownShip NPC recommendations!
House 1: Hekkeler; can be found in HomeTown
House 2 MacClean; can be found in W. Cape Beach. He’ll take you to a secret A+ fishing spot.
House 3: Baretta; can be found in the armory at Windia. She’ll stock the best late-game equipment.
House 4: Barose; He’s inside a house in the Wise Tree's Memory and can teach a total of four powerful spells.
House 5: Hanz; He can be found in HomeTown after getting Spar. He sells stat-boosting items.
House 6: Daiye; He can be found in Windia. He sells fish, some of which are ideal ingredients for your cooking carpenter.

24) After you fill the first 3 houses in TownShip with NPCs, speak to your carpenter and he can offer to expand your town (for a price). Once he starts, you can actually repeatedly enter and exit your town over and over until the expansion is complete.

25) Jean learns the “Warp” spell for town teleportation at Level 14. Before then, it’s a good idea to have him lead as a jumbo frog to reduce random encounters and skip over cliffs and gaps, like between the woods and Capitan.

26) Once you get to Sima Fort, you’ll be there for a long while, and Jean won’t be available. Nevertheless, you can eventually take a boat out of the castle. When you do get Jean back, put him in the lead & press “Y” at the docks to leave Sima Fort instantly.

27) There’s lots to explore in Sima Fort. After you finish this long scenario, remember to go to the cockroach pit area to get into the treasure rooms. There’s also a “person of interest” you’ll need to “help” out here. Get ready for a nice surprise when you leave to head back to TownShip and Home Town! ;)

28) When you get to W. Cape (finally, eh?), you’ll reach a wooden gate blocking a ladder. Put the "Master of Breaking Things" in lead & press “Y”. ;)
I was admittedly stuck on this part for an embarrassingly long time the first time I played Breath of Fire II! 😅


29) Once you’re able to sail the seas, head to the desert southeast of TownShip. Pressing Select (Minus on Switch) will display your map. North of the beach there, look for a sandy whirlpool. After exploring this hidden abode, talk to the students on the second floor of M. School in Home Town for a special surprise!

30) Ring the whale bell at a beach and sail north of Windia & you’ll come across an island with a house. Congrats, you’ve found one of the best grinding spots in the game, and fans of the first Breath of Fire will appreciate what you’ll find inside the house.


31) After the predicament in the carnival near Tunlan, you’re tasked with catching an Uparupa in the cave under the bridge near Coursair (go by whale). But first, go to the Owl Woods west of Windia and north of the Monster Hunters’ house to get Owlfruits, which will be used as Uparupa bait. Be prepared for a tough boss fight!

This is one of two Uparupas that can be caught.

This is the second Uparupa that can be caught.

Freeing the Uparupa after battle will give you a reward.

After claiming the reward, exit the room, come back in, and find a second reward!
32) Only two of the eight Uparupas can be caught. To save you time (and frustration), see the screenshots above so you know which Uparupa holes to pay attention to. If you let the Uparupa go after battle, you’ll win a prize. If you re-enter this area after getting your prize, you’ll get a second prize! Next, go back to the carnival & talk to the ringleader for new dialogue.


33) If TownShip has been upgraded to six houses, go into the well on the east side. Then, go to the main house in Guntz (located on an island west of HomeTown) & check behind the bookcases for a staircase. Chat with the hidden person here. They'll serve a purpose much later on.

34) Off to Highfort? LEVEL UP STEN TO 20+! Equip him well, and stock up on healing items; you’ll be in Highfort without a way out for the whole scenario. If you want, Sten's best weapon DemonDR is a very rare drop from the Sheef enemy in Thieves’ Tomb, in the southern-central part of the desert.

35) To help the Queen of Tunlan, you'll need to find an old man in Mt. Maori, which is at an island northwest of HomeTown. Bring Katt or Nina; you'll need one of them to talk to the guy to progress. If you feel like exploring the whole area right now to get treasures, bring Sten to cross the gaps.


36) After going back to Tunlan, you'll revisit Mt. Maori to speak to the apprentice and scavenge for a mushroom. Quickly take a screenshot of this mushroom and bring Sten to cross the gaps as you climb the mountain. If you mess up & pick the wrong mushroom, use Rewind to avoid prolonged backtracking.
…TO BE CONTINUED!!